JS-container installation
Description how to install the JS-container on the site pages
To increase the performance of audience and retargeting campaigns, the tracking container uses asynchronous DMP and SSP matching, which is resulted in the reach increase and better quality of ad placements.
There is no domain transfer within matching, that is why there is no risk to display audience platform to any external partners.
There are 2 ways to install the MediaSniper JS-container on the site page:
-
Directly on website pages
-
Using Google Tag Manager (GTM)
JS-container: supported actionsThe MediaSniper JS-container supports following specified actions, running automatically:
vclick (validate click) - container loading
aclick (active click)
scroll is larger than the screenuser stays on the site longer than 1 minutemoving to the next pagea6 - active click by the Google Analytics version meaning moving to the next page. It runs automatically.The MediaSniper JS-container supports following arbitrary actions:
а1 - аN - it is any other arbitrary action configured depending on occured eventFor example, а1 is a click on the link, а2 is a click on the button.
For calling some actions you should use the command generalPixel.postClick()
To run them, you must call this command at the right time and specify he name of the desired action in the first parameter.
<a href="#" onClick=generalPixel.postClick("a1")>Click me </a>

<a href="#" onClick=generalPixel.postClick("a1", "test")>Click me </a> or

<a href="#" onClick=generalPixel.postClick("a1", 123)>Click me </a>
1. Placement of the MediaSniper JS-container directly on the website
The current chapter of documentation describes how to place the MediaSniper JS-container on the site pages and how to configure calling command that runs by clicking the link or on the button.
JS CODE BELOW IS AN EXAMPLE.
DO NOT PLACE IT ON YOUR WEBSITE PAGES.
MANAGER WILL SEND YOU THE CODE GENERATED FOR YOUR ADVERTISING CAMPAIGN
<script async src="https://static.terratraf.io/engine/GP.js"></script>

<script>
     window.generalPixel = window.generalPixel || [];
     window.generalPixel.push({type:'GPID', id:'XXXXXXXX'});
     window.generalPixel.push({UserID:'XXX'});
</script>

Ckick on the link
generalPixel.postClick('a1')
Click on the button
generalPixel.postClick('a2')
Adding the MediaSniper JS-container to the page source code:
- To install the container, you need to place the code on all website pages, right after the body tag
- Then add the calling generalPixel.postClick () function through onClick
An example of the correct placement of JS-container and calling the function generalPixel.postClick () can be found here: http://demo.terratraf.com/container/gp/onclick_test/

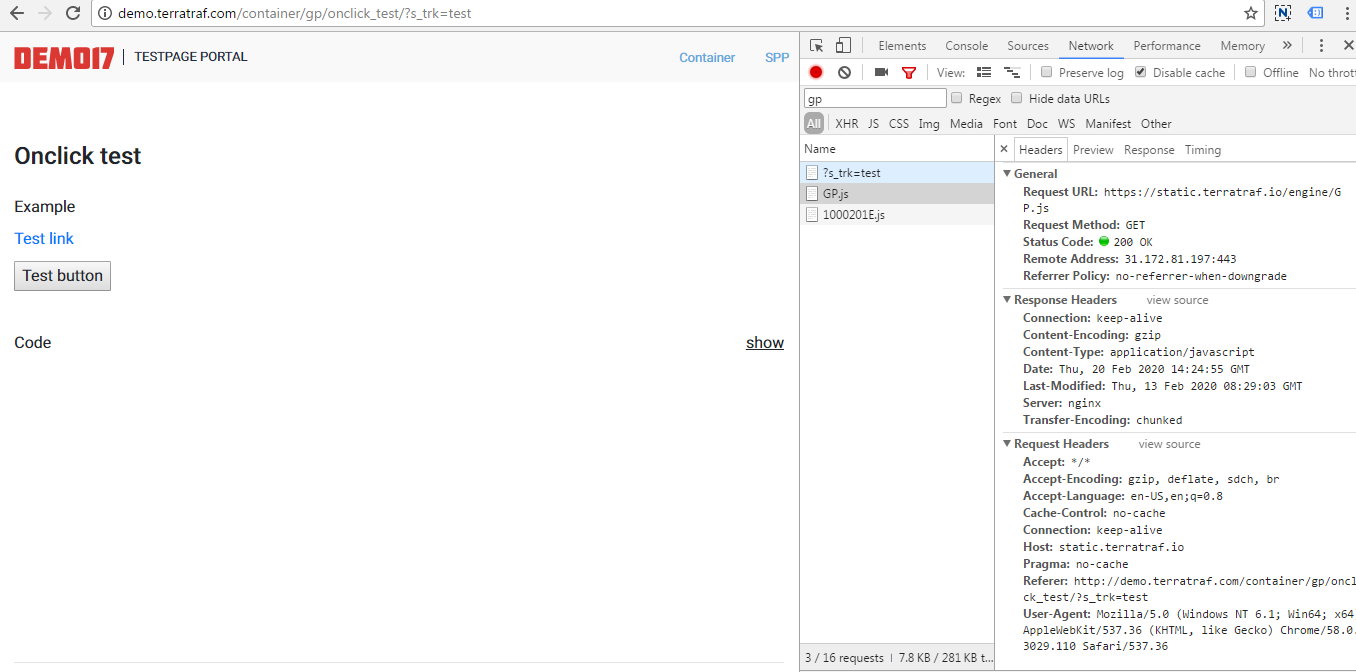
Then we should check that everythng runs correctly. To do it, please visit http://demo.terratraf.com/container/gp/onclick_test/?s_trk=test and make sure that JS-container is called while webpage loading:
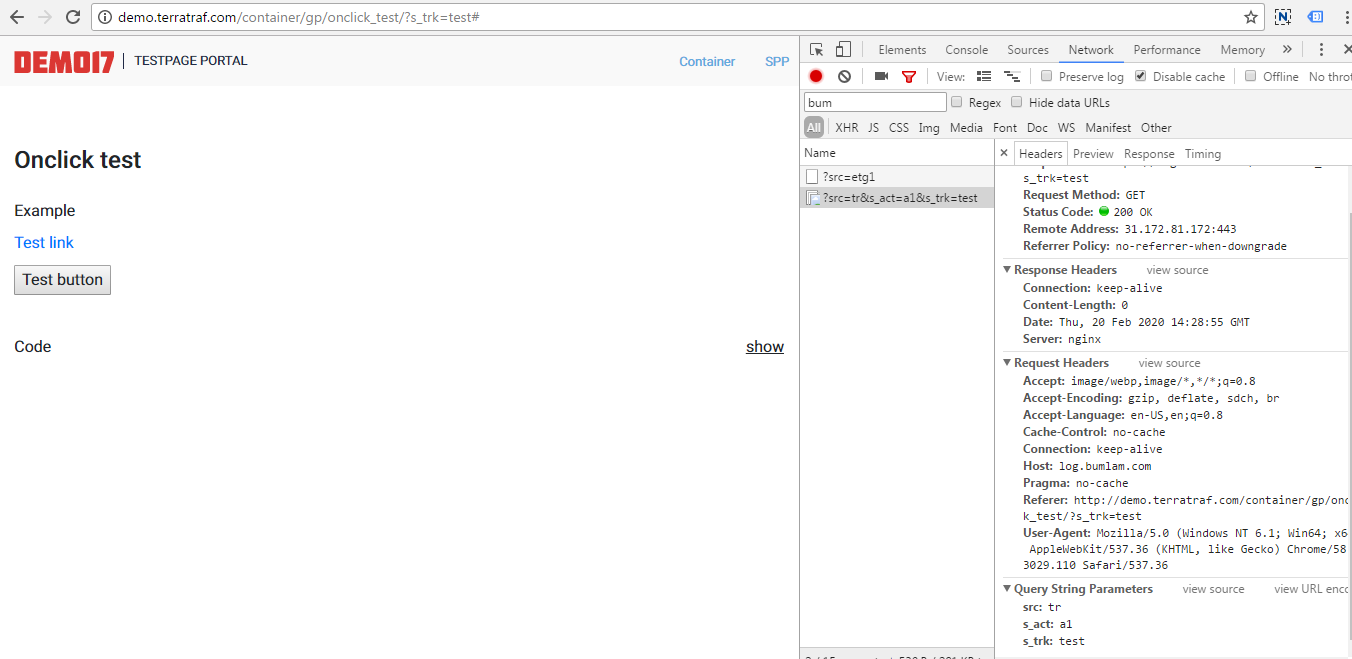
By clicking the link, the command “Click on the link” generalPixel.postClick('a1') is called:
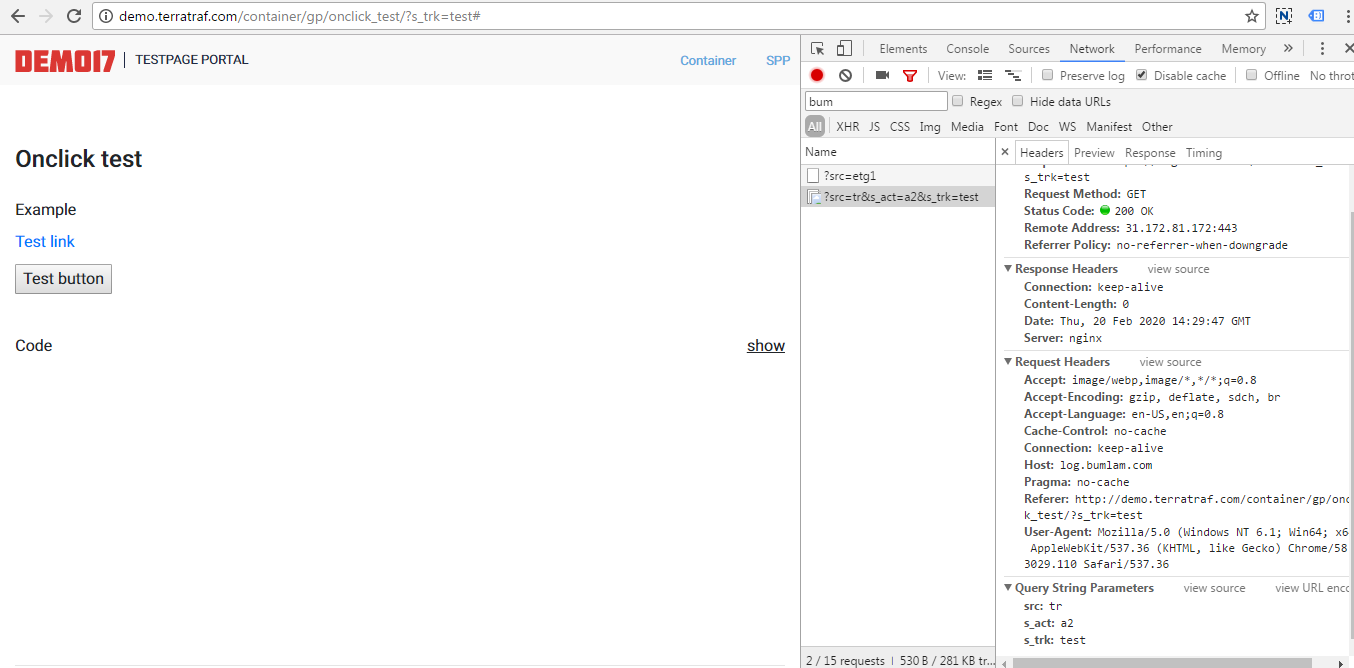
By clicking the button the command ”Click on the button”generalPixel.postClick('a2') is called:
2. Placement of JS-container via Google Tag Manager (hereinafter referred to as the GTM)
Google Tag Manager is a Google tool, which allows to place JS code of external services (such as Yandex Metrika, Google Analytics, LiveInternet и etc.) on web pages and manage them from one interface.
The current chapter of documentation describes how to place the MediaSniper JS-container on web pages via GTM and how to use the functions running by clicking the link, clicking the button or moving to the certain page.
JS CODE BELOW IS AN EXAMPLE.
DO NOT PLACE IT ON YOUR WEBSITE PAGES
MANAGER WILL SEND YOU THE CODE GENERATED FOR YOUR ADVERTISING CAMPAIGN
<script async src="https://static.terratraf.io/engine/GP.js"></script>

<script>
     window.generalPixel = window.generalPixel || [];
     window.generalPixel.push({type:'GPID', id:'XXXXXXXX'});
     window.generalPixel.push({UserID:'XXX'});
</script>

//Click on gtm link
generalPixel.postClick('a1')
//Click on gtm button
generalPixel.postClick('a2')
//Moving to the page demo.terratraf.com/container/gp/gtm_test/
generalPixel.postClick('a3')
Additional information about Google Tag Manager
Getting started with GTM: : https://support.google.com/tagmanager/answer/6103696?hl=ru&ref_topic=3441530 .
How to place GTM container in CMS Wordpress: http://prometriki.ru/ustanovka-google-tag-manager-v-wordpress/
After you have created the account and placed the GTM container code on the site pages, you need to create tags for the MediaSniper JS-container and for the required functions.
Creating a tag calling MediaSniper container:
- Choose "Tags" in the left menu and click on the "Create" button
- Enter the name of a new tag in the Tag Name field, e.g., “Calling JS-container”. Choose Tag type: Custom HTML. After that, you will see HTML field, place the code there. Choose trigger “All pages” in Trigger settings and click “Save”:
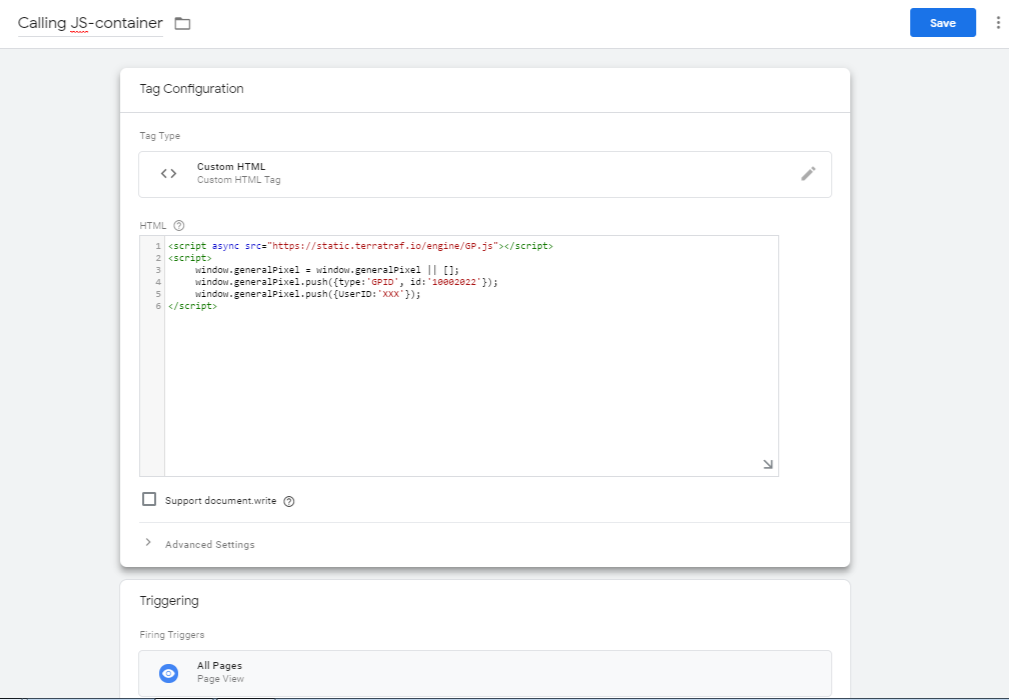
If everythng was made correct, you wiil see created tag in the tag list.
Creating trigger for a1 function "Click on GTM link":
This function will run while clicking the specified link, especially while clicking the link with id = test_link_gtm
- Choose "Variables" in the menu and configure confitions for activation by "Clicks". It is enough to choose only Click ID, but it is possible to choose all conditions:
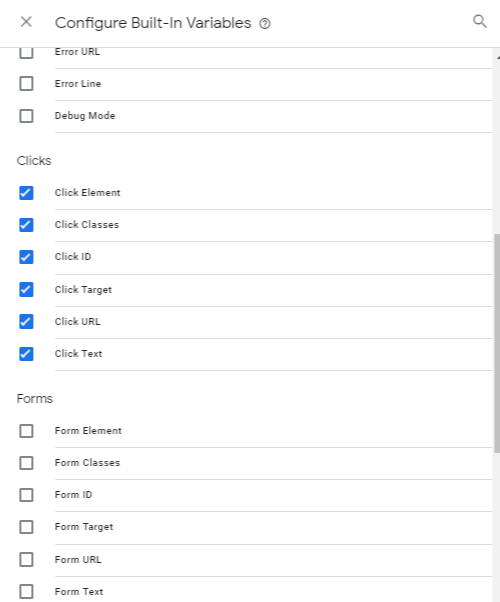
- Having done this, we will create the condition for calling the function, i.e. we create a new trigger
- Choose "Triggers" in the menu and click "Create"
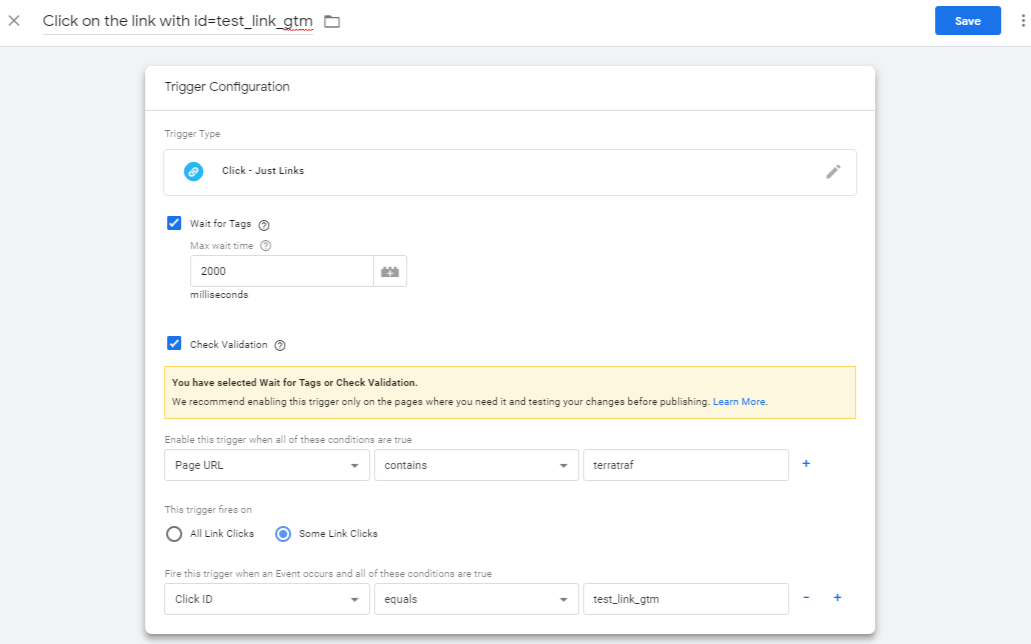
- Enter a trigger name, for example, “Click on the link with id=test_link_gtm”
- Click on the "Trigger configuration" and choose "Just click" trigger type
When you click on the link, the browser usually loads a new page and interrupts all the rest HTTP-requests, so we have a slight dalay and that is why we can save time to activate tags.
To do it, we should check the box "Wait for Tags". The link won't be opened till all the tags are activated or till the time out. Check the box "Check Validation", so the tags will be activated only when the link is opened, otherwise they will be activated every time the link is clicked.
Specify the Page URL in the connection conditions, it contains terratraf, it means that the clicks on the links will be seen on all web pages containing the word "terratraf".
Select "Some link clicks" in activation conditions and specify Click ID equals test_link_gtm and click "Save".
Creating tag for a1 function "Click on GTM link":
- Choose "Tags" in the menu
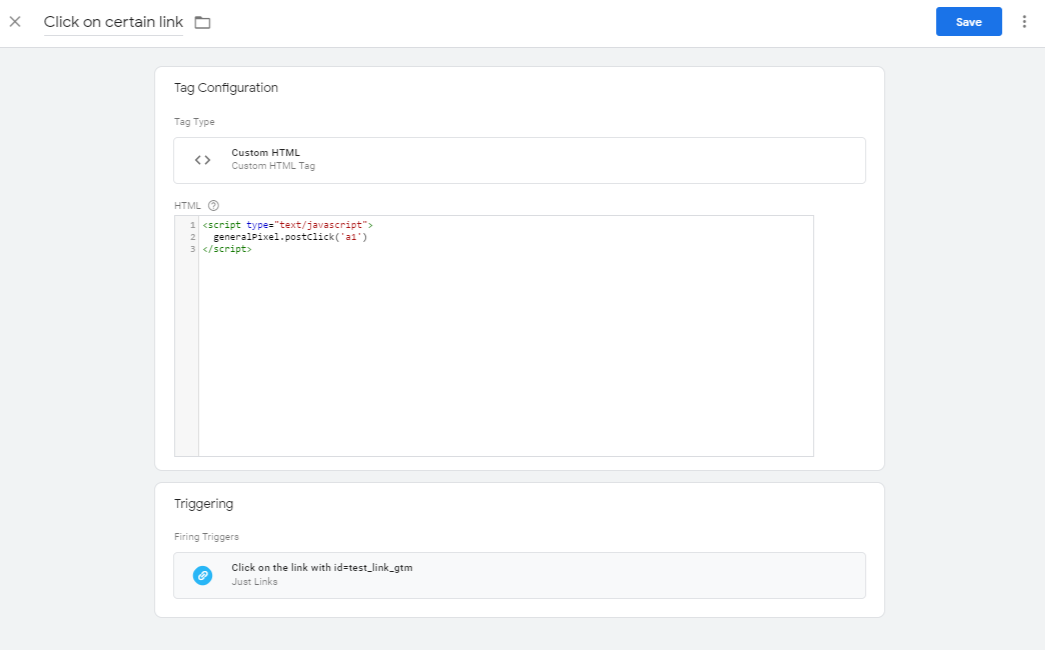
- Click “Create” and enter the name of a new tag in the Tag Name field, e.g. “Click on certain link”
- Choose "Custom HTML" tag type in Configuration.
- After that, place JS code for calling generalPixel.postClick("a1") in the HTML field.
- In Triggers choose “Click on the link with id=test_link_gtm”. Click “Save”:
Creating trigger for a2 function "Click on GTM button":
- Choose “Triggers” and click “Create”
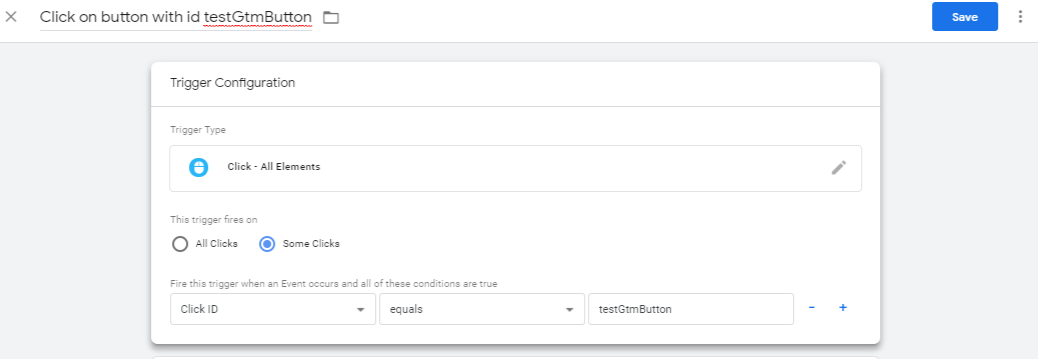
- Enter the name of a new trigger in the Trigger Name field, e.g. “Click on button with id testGtmButton”.
- In trigger type choose “Click — all elements”.
- In activation conditions choose "Some clicks" and specify the following: Click ID equals to testGtmButton and click “Save”.
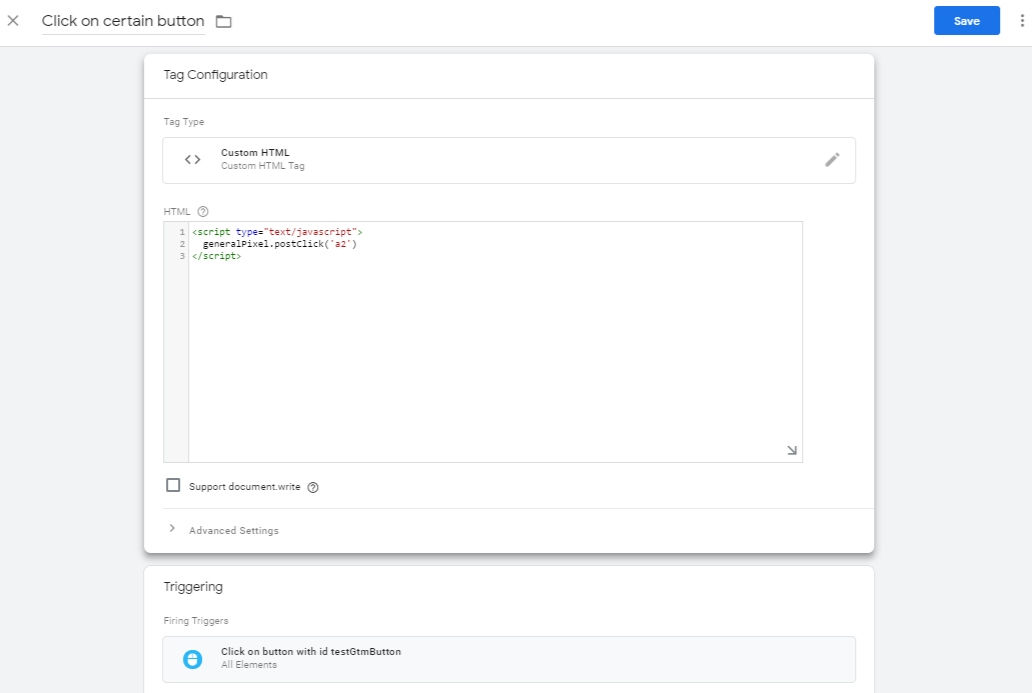
Creating tag for a2 function "Click on GTM button":
- Choose “Tags”
- Click “Create” and enter the name of a new tag in the Tag Name field, e.g. “Click on certain button”.
3.Choose "Custom HTML" tag type in Configuration.
4.After that, place JS code for calling generalPixel.postClick("a2") in the HTML field. - In Triggers choose “Click on the button with id testGtmButton”. Then click “Save
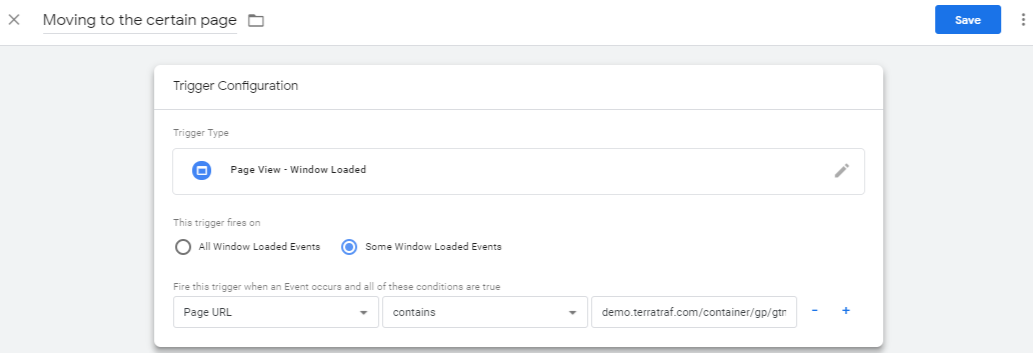
Creating trigger for a3 function "Moving to demo.terratraf.com/container/gp/gtm_test/ page":
- Choose “Triggers” and click “Create”
- Enter the name of a new trigger in the Trigger Name field, e.g. “Moving to the certain page”.
- In Triggers choose “Page view — Window loaded”.
Please note:The "Page view" is being registered when page is loading in the user's browser.
In the "Trigger type" you can choose, when exactly the tag should be activated:
as soon as the browser starts syntactic analysing the page ("Page View")at the end of the DOM model assembly ("DOM Ready")when the page is loaded completely, inclusive images, scripts etc. ("Window Loaded").The moment of load registering can be of a great importance, if DOM or JavaScript variables are used in the tag for collecting dynamic values.
All tags like "Page View", interacting with DOM for substitution of variable values should use the "DOM Ready" setting. This is important for the correct definition of variables.
- Choose "Some Window Loaded Events"
- Specify the following condition for triggering the trigger - Page URL contains demo.terratraf.com/container/gp/gtm_test and click the "Save" button.
Please note:Please make sure while adding the condition Page URL contains demo.terratraf.com/container/gp/gtm_test, that all required variables are set, it means check the box "Page URL"
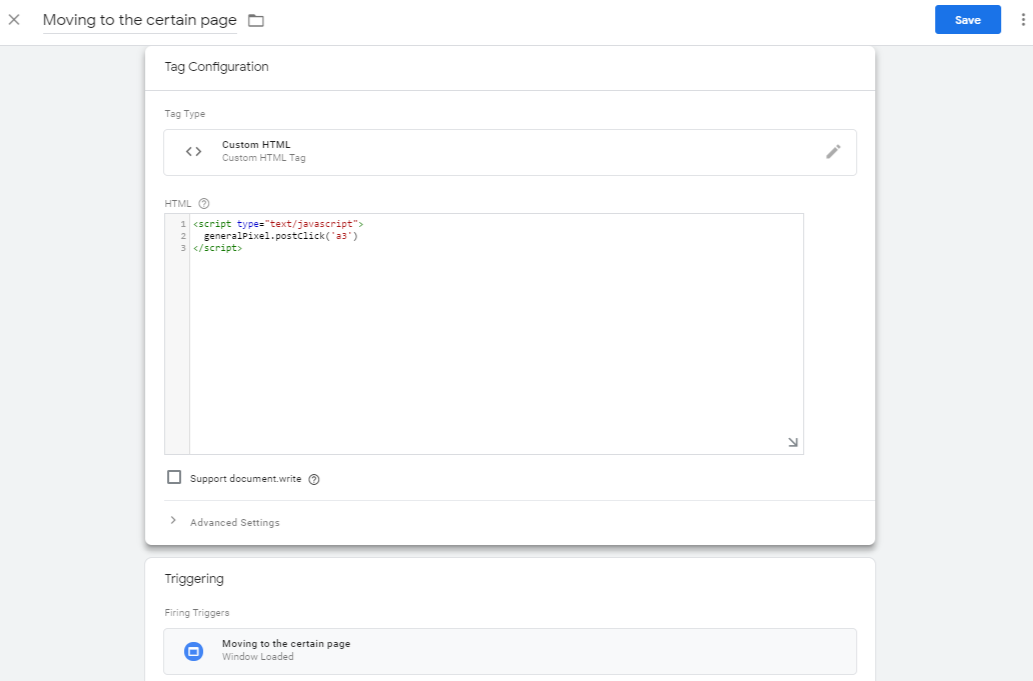
Creating tag for a3 function "Moving to demo.terratraf.com/container/gp/gtm_test/ page":
- Choose “Tags” and click “Create”
- Enter the name of a new tag in the Tag Name field, e.g. “Moving to the certain page”.
- Choose "Custom HTML" tag type in Configuration.
- After that, place JS code for calling function in the HTML field.
- In Triggers choose “Moving to the certain page”. Then click “Save”:
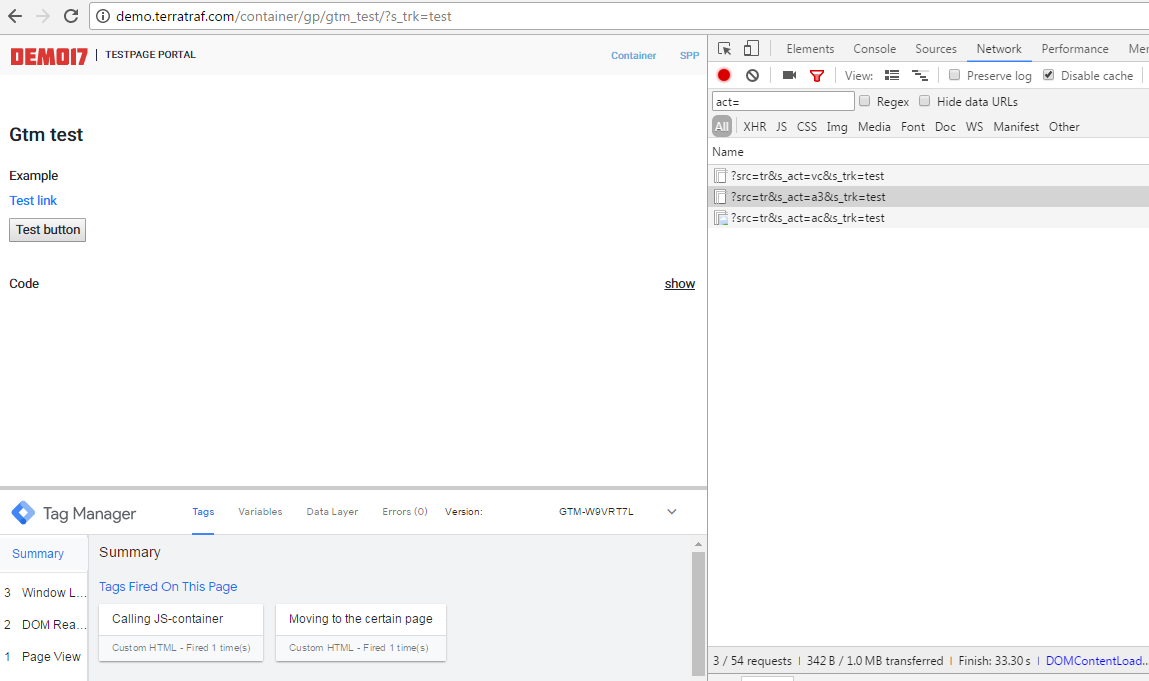
Tags testing:
Click "Preview"

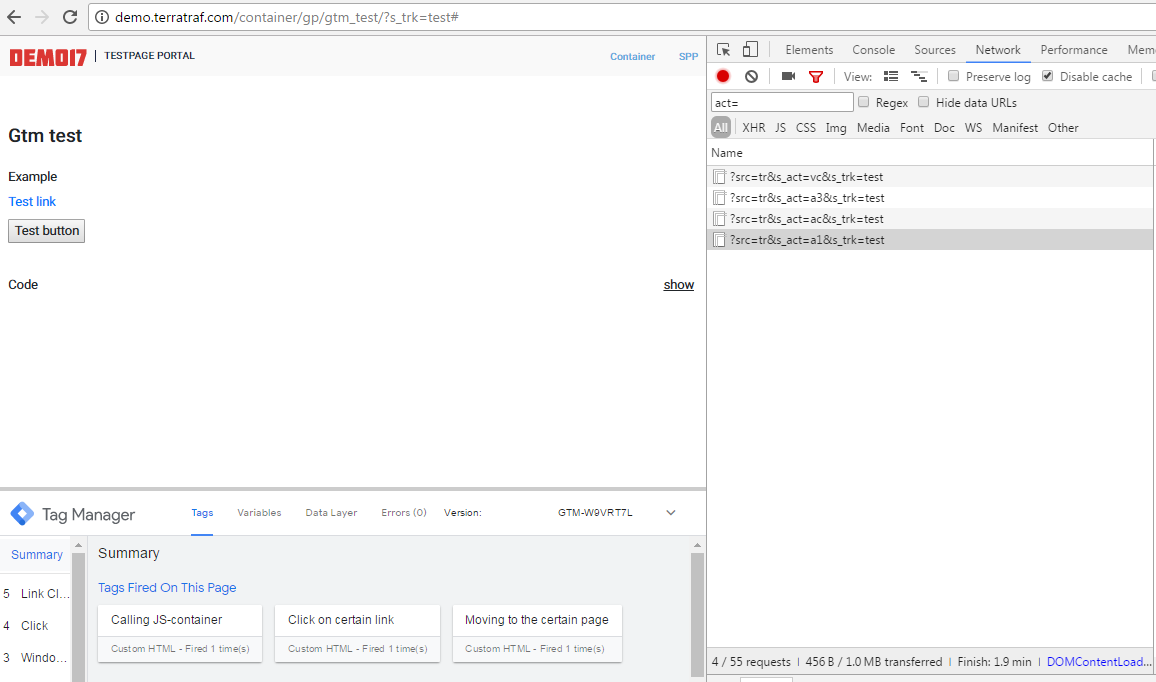
Use the same browser where GTM runs and visit the test page: http://demo.terratraf.com/container/gp/gtm_test/?s_trk=test. We see that JS-container is called as well as the function "Moving to page demo.terratraf.com/container/gp/gtm_test/" generalPixel.postClick('a3') is running when loading page:
By clicking the link, the “Click on GTM link” function is called generalPixel.postClick ('a1'):
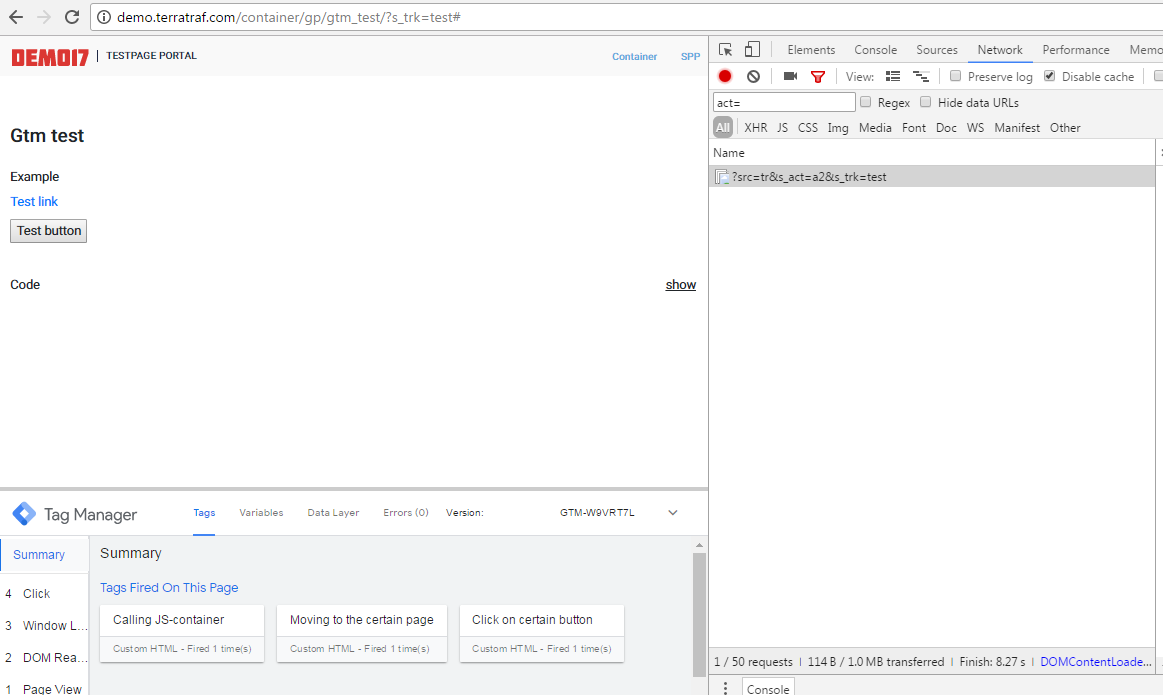
By clicking the button, the “Click on GTM button” function is called generalPixel.postClick('a2'):
After you checked and made sure that everything works correctly, click “Publish”.
3. Light Page Containers
JS CODE BELOW IS AN EXAMPLE.
DO NOT PLACE IT ON YOUR WEBSITE PAGES.
MANAGER WILL SEND YOU THE CODE GENERATED FOR YOUR ADVERTISING CAMPAIGN
To track the unload via Turbo pages the container will be as follows:
https://sync.bumlam.com/?src=gp3&cid=A2D4FF&cmp=pxleadvisitc8231211006&act=turbov8006&page={originalURL}&r={referrer}More detailed Yandex Turbo
To track the unload via AMP pages the container will be as follows:
<amp-pixel src="https://sync.bumlam.com/?src=gp3&cid=A2D4FF&cmp=pxleadvisitc8006&act=ampv800123123123126&page=SOURCE_URL&r=DOCUMENT_REFERRER" layout="nodisplay"></amp-pixel>More detailed AMP
Updated 7 months ago
